Vicki @ Sew Inspired has inspired us with her chicken quilt pattern. Madi added sashings and turned it into a full quilt! See Vicki's original pattern HERE.

Vicki has a great tutorial of this chicken block with an image showing where your seams go and measurements for each cut piece! (click the link above to go to her page)
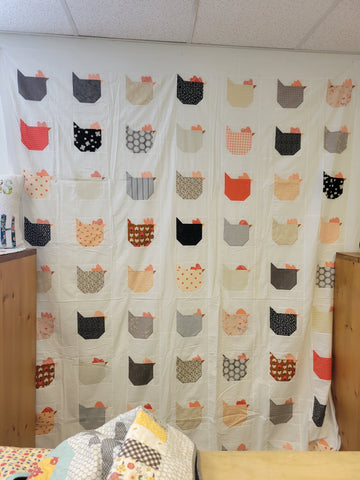
I ended up making 80 blocks so it's 8 chickens wide and 10 chickens in length (who thought we'd be measuring a quilt in chickens instead of inches!? Haha).
For those that are less math-inclined, though, I thought I'd post what I did for sub-cutting and sashings. Soooo, for the chicken blocks, I cut:
(80) 5.5" x 6.5" chicken bodies in an assortment of prints - Cut a 5.5" x WOF strip. Subcut those into 6.5" pieces. You get (6) chickens per WOF cut, so you'll need a total of (14) WOF cuts...you'll have a few extras to play with for layout.
(80) 2" x 2" matching fabrics for chicken bodies --this will be the chicken tail feathers. Cut a 2" x WOF strip . Subcut those into 2" pieces. You'll get (20) tails per WOF cut, so make at least (4) WOF cuts.
(240) 2" x 2" background fabric cuts (I used white, but use whatever suits you!) Same as above, but you'll need (12) WOF cuts.
(80) 6.5" x 2" background fabric cuts - Cut a 6.5" x WOF strip. Subcut those into 2" pieces. You get (20) cuts per WOF cut, so you'll need at least (4) WOF cuts.
(80) 5.5" x 2" background fabric cuts - Cut a 5.5" x WOF strip. Subcut those into 2" pieces. You'll get (20) cuts per WOF cut, so you'll need at least (4) WOF cuts.
(80) 1.25" x 1.25" beaks - Cut a 1.25" x WOF strip. Subcut those into 1.25" pieces. You'll get (32) cuts per WOF cut, so you'll need at least (3) WOF cuts.
(80) applique combs - You'll need approximately a 2" x 3" piece for each comb.
For sashings, I cut:
(9) 4.5" x 96.5" vertical sashing strips from background fabric and vertical borders - I cut (22) 4.5" x WOF cuts and sewed them all together with a straight seam. Then, one by one, I cut them down to 96.5." This way, the seams end up in different places for each column, but it doesn't waste fabric!
(2) 4.5" x 92.5" horizontal borders - I cut (5) 4.5" x WOF cuts (you can use any remainder from the vertical sashing strips since they're the same width), again sewed them together with a straight seam, and then cut them down to 92.5."
(72) 4.5" x 7.5" horizontal sashing strips from background fabric - Cut a 4.5" x WOF strip. Subcut those into 7.5" strips. You'll get (5) cuts per WOF cut, so you'll need at least (15) WOF cuts. If you have leftovers from the borders/long sashing pieces, feel free to use those up too!
If you want an outer border, cut:
(2) (desired width + 1/2") x 100.5" for vertical outer border
(2) (desired width + 1/2") x (92.5" + desired width + 1/2") for horizontal outer border

Follow Vicki's instructions to complete the chickens (I like sewing the applique into the seam with FlexiFuse, and freehanding my applique by cutting 2" strips of the fusible so I don't make them too big/too small). Here's a link to our FB live where we give some tips on making the applique combs: https://fb.watch/jK-sQ4uQlD/
Then I lay them out in columns, labeling "Column 1," "Column 2," and so forth, keeping the chickens in order from top block to bottom block. With a 1/4" seam, add your 4.5" x 7.5" pieces to the base of each chicken, except on the bottom chicken in each column.
Sew your columns of chickens together! You should have a sashing piece in between each one, except for on top of the top chicken in each column and the base of the bottom chicken in each column. This is where your horizontal border will attach at the end. Finish sewing each column so you have 8 columns of chickens.
Now it's time to add your vertical sashing! I like to pin on pieces with long lengths to ensure you don't have stretching and unevenness. Pin the top and bottom, then find the middles and pin together. Then pin the middle of each middle and so on until you're comfortable with the amount of pins you have.
With a 1/4" seam, add a column of 4.5" x 96.5" sashing to the right of Column 1 of chickens. Repeat with each column of chickens, then add your last sashing to the left of Column 1 (this is your inner border).
Sew all your columns together now, and add your horizontal upper and lower borders on top, making sure to pin!
If you want an outer border, make sure to follow my calculation equation above. For example, if I want a 4" finished border, I'll cut my pieces at:
4.5" x 100.5" for my vertical borders, which I'll attach first
and
4.5" x 97" for my horizontal borders.
You're finished with your quilt top! Now quilt it (or send it to your quilter--this is at least a queen-size quilt!) and bind as desired.
Thanks for following along! Use code FFLIVE for free shipping for your own pack of FlexiFuse: https://flexifuse.com/collections/flexifuse-fusible/products/flexifuse-lightweight-fusible-web-25-sheets-8-x-10-5